The most frequent problem seen by owners of Roomba, iRobot’s robotic vacuum cleaner, is Roomba Brush Not Spinning. This smart gadget uses the most recent technology and artificial intelligence concepts to clean your home quickly, effectively, and, most importantly, autonomously.
Finding out why a robot isn’t operating can be challenging because there are so many parts within the robotic vacuum cleaner, especially when the problems are mechanical. Fortunately, most Roomba problems can be quickly fixed with the proper instructions and a few essential tools.
By the end of the article, you’ll know why your Roomba’s side brush might not spin and what you can do to fix it!
First, do maintenance on your Roomba to check for potential debris in the side brush and internal components. After that, inspect the side brush, clear the jammed module, and lube the side motor shaft.
Let’s look at the potential causes of the problem before we go on to the troubleshooting method.
Also read: peleton screen not turning on.
Why is my Roomba side brush not spinning?
Sometimes, the timetable of your Roomba is everything. If you set up the cleaning schedule incorrectly, your side brush might become caught and stop spinning.
The charge of the Roomba and its batteries must also be taken into account.
The following are some possible reasons that might affect the side brush on your Roomba:
The side brush module has become jammed
The most common reason for a Roomba side brush not spinning is when hair or other debris clogs the side brush. If the side brush hasn’t been cleaned in a while, you could be astonished at how much dust and debris has accumulated there. The most frequent reason is this.
Dust and grime buildup might also block the side brush gearbox. The side brush is spun by the gearbox’s gears, which transmit power from the motor to it. The side brush stops operating as the gearbox clogs up with hair and grime and prevents appropriate gear rotation.
Side brush motors with inadequate or insufficient lubrication
If the side brushes on your Roomba won’t spin freely, your motor may be underpowered. Despite being uncommon, the side brush motor has occasionally failed. IRobot will send you a replacement if you contact them and describe the side brush’s behavior.
Faulty components
The side brush may also not function due to damaged components. Run the Demo to check the side brush motor on your Roomba and ensure it’s working. A malfunctioning module might cause the motor to stop working.
Check the yellow portion of the side brush for cracks or extensive tearing if the motor turns on, but the side brush does not spin. The yellow portion of the side brush occasionally has a little break that keeps it from freely spinning. If so, a new side brush ought to be used.
Dirty gearbox
The Roomba’s “heart” is its gearbox. You won’t be able to use some of your vacuum’s most crucial functions, like the side brush, if it has any problems.
As the trash accumulates, a coating may form, preventing the Roomba from moving. When this occurs, take the gearbox out and thoroughly clean it. Many people have completed this straightforward process and reported back to us.
Motor Burned Out
The side brush motors operate continuously when you program the Roomba to clean your floors. Unfortunately, this results in it wearing out quickly throughout its life.
Unfortunately, if the side brush won’t spin smoothly, the motor may wear out prematurely. For instance, a dirt side brush can make spinning the brush more difficult and overload the motor.
If that continues for too long, the engine will overheat and stop working. The side brush won’t be able to rotate at that time.
Look for wires or damaged connectors
See whether there are any loose, corroded, or damaged cables or connectors on this iRobot.
To ensure the motor has electricity, look around the house for a DVOM (digital volt-ohm meter) and inspect the connector. You might consider making the required repairs for any issue or replacing the engine entirely.
The motherboard must be carefully inspected to see if any internal parts are loose, damaged, or burned.
Battery Issue
There are two parts to the battery issue. One is when the power runs out, and the other is when the battery degrades to the point that it can no longer be utilized.
They speculate that there may be problems with the entire system when the brush refuses to spin. But in fact, it isn’t. The only thing you need to do is check to see if your iRobot’s battery is in a stable power state or not.
Additionally, even if you constantly monitor the battery’s charge, a battery may be harmed occasionally. In such a scenario, you won’t be able to use that battery any longer and will need to get a new one.
How to fix the Roomba side brush that is not spinning?
If you wish to repair a broken Roomba side brush quickly and easily, purchase a replacement side brush module. However, if you want to repair a non-spinning Roomba side brush yourself, follow these instructions:
#1 Power cycle Your Roomba Robot
Even if the hardware is more likely to blame, if there is a transitory malfunction, a forceful discharge may be able to help you fix the problem.
Your device will undergo a power cycle due to this procedure, giving it a cold boot when it restarts.
Here’s how to properly discharge (hard reset) your Roomba robot:
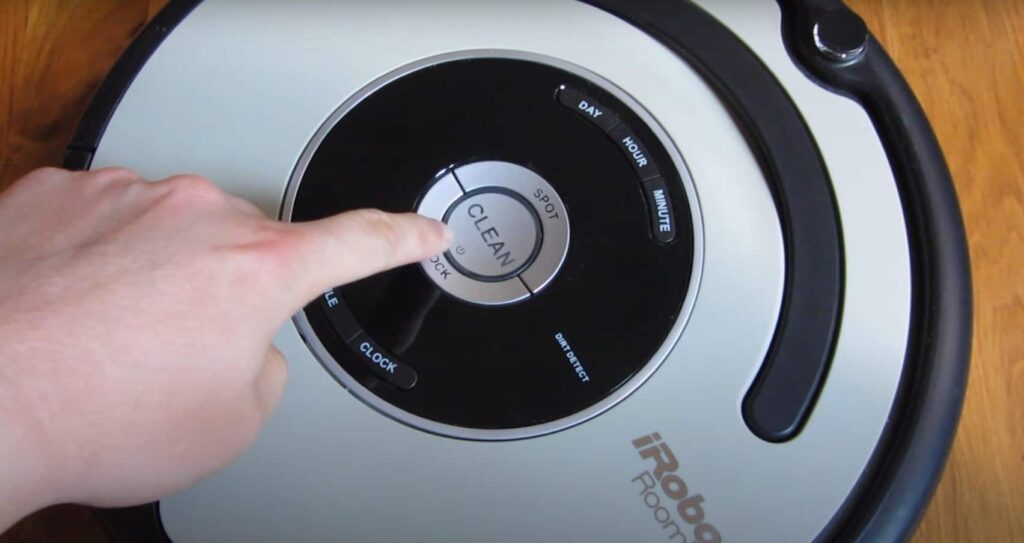
- 1. Look for the CLEAN button on your Roomba robotic vacuum.
- 2. Once the LEDs on your Roomba begin blinking, hold the CLEAN button down for 20 seconds.
- 3. After about a minute, release the button.
Plug your Roomba into the power adapter and give it a few minutes to charge if the side brush doesn’t turn on.
If it doesn’t work, kindly move on to our next suggestion.
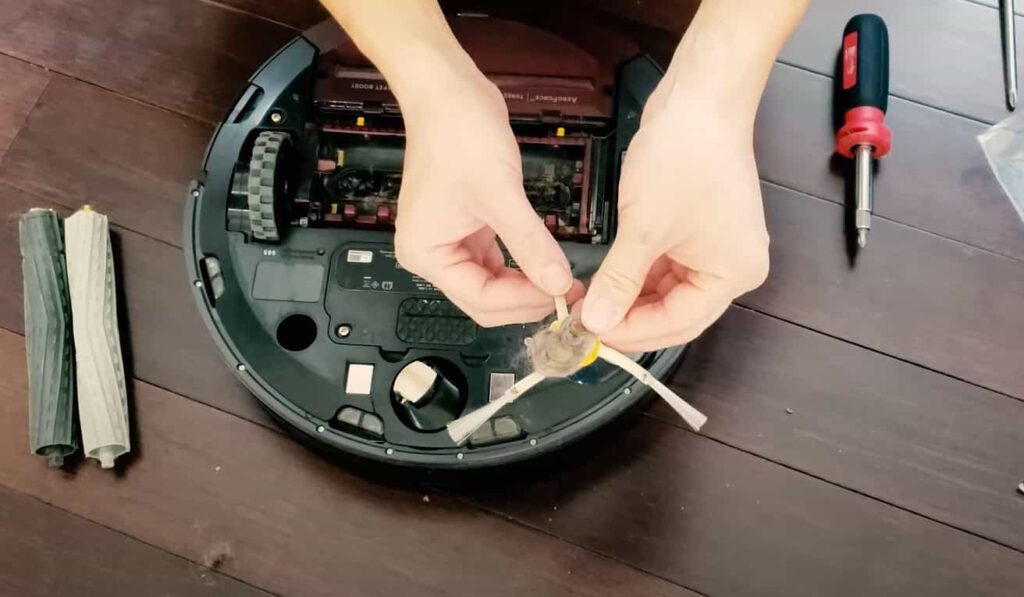
#2 Remove dust from the side brush’s base
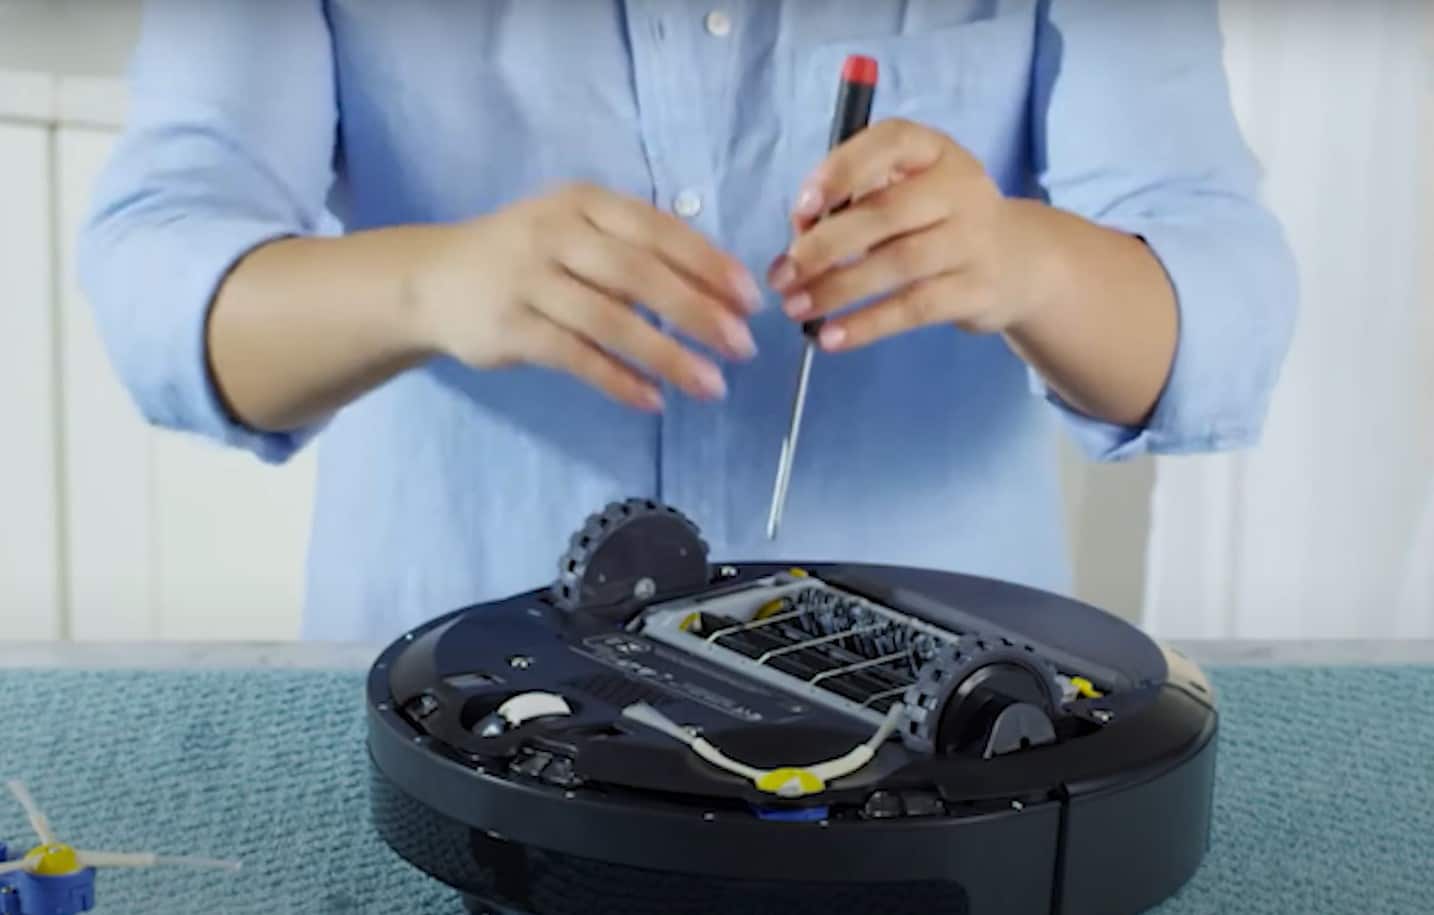
Start by clearing out all the dust that has accumulated beneath the side brush. The identical method removes and replaces the side brushes on all Roombas. A tiny screwdriver may be used to remove the Roomba’s side screw. Remove the brush from the Roomba’s side by unscrewing it.
After all the dust has been removed, replace the side brush and clean it again if it does not spin freely. After that, it ought to operate normally. If the brush continues to not spin after this, it has to be fixed or replaced. To fix the side brush, you must examine the gearbox.
#3 Clean the motor shaft on the side brush
While observing it, lightly lubricate the side brush motor to ensure smooth operation. A modest amount of oil should be applied to the motor shaft. The fact that this precise movement made the side brush spin better than ever was a welcome surprise! It benefits from having some grease on hand.
The side brush gearbox must then be put back together. After cleaning and lubricating, everything must be assembled again. Once the side brush is connected and manually spun, reassemble the side brush module. It is normal if the side brush spins freely.
#4 Loosen the Side Brush
It’s conceivable that if you recently reinstalled your Roomba, you screwed the brush on too firmly, preventing it from spinning freely.
Since both the brush and the wheels are sensitive to the screws, even a small amount of over-screwing might result in major problems.
To correctly collect your side brush, follow these steps:
- 1. Take a screwdriver that fits the Roomba’s central screw.
- 2. After holding the cleaning button for 20 seconds, flip the Roomba upside down and turn it off.
- 3. Completely unscrew the screw, but leave the side brush in place.
- 4. Reinstall the screw and tighten it gradually, checking the brush’s capacity to spin between each step.
- 5. After giving it a solid push, your side brush should be able to spin on its own for two to three seconds.
If it remains stationary despite your artificial inertia, examine more closely what keeps it from spinning.
#5 Clean the gearbox
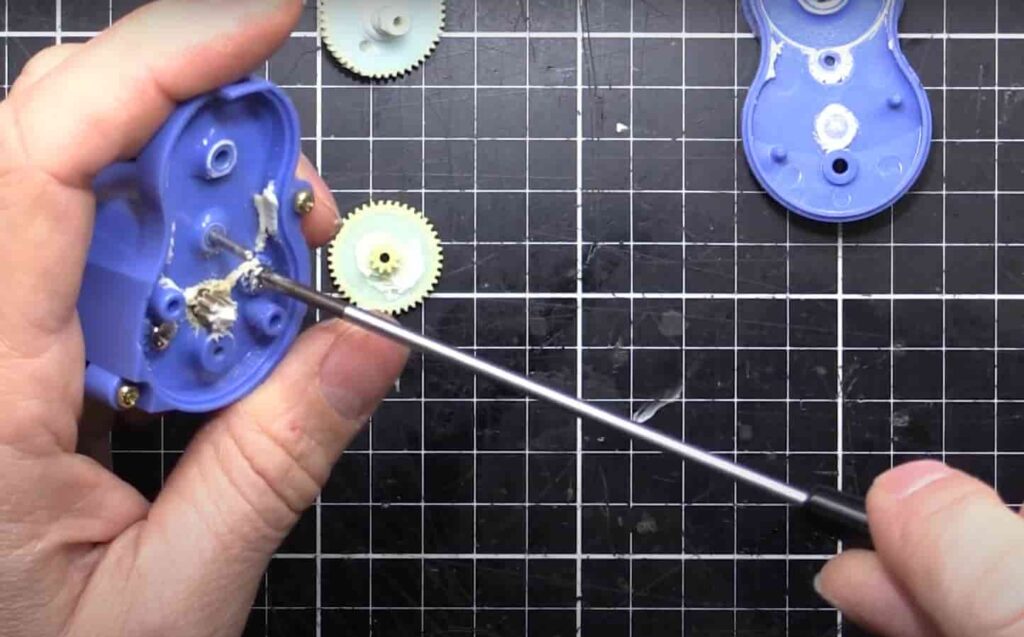
Your side brush’s internal dirt may not be the sole obstruction preventing the wheel from spinning.
As you are undoubtedly aware, a gearbox beneath the side brush regulates how fast it spins. The side brush won’t even attempt to spin if dirt has accumulated within the gearbox.
Here are a few simple procedures for cleaning a gearbox:
- 1. First, unscrew the screw to remove the side brush.
- 2. The gearbox in the blue-purple compartment should be underneath.
- 3. Find and remove the gearbox screw.
- 4. There are two cogwheels inside the gearbox, which must be clean of debris.
- 5. To thoroughly clean the gearbox, we advise using the vacuum cleaner once more while rotating the cogwheel.
Keep in mind that the cogwheels must rotate freely, just like the side brush, before reinstalling the compartment.
#6 Route Modification
Roomba is likely having trouble starting the side brush because there are obstacles in its path or no way for Roomba to avoid them.
For this remedy, we suggest carefully inspecting your router and the items/furniture in the path of your Roomba.
Make sure the path is laid out so Roomba can go about it quickly. Additionally, put some dirt in front of the Roomba and test the new path with the brush.
#7 Reset the robot Roomba
If none of the above-suggested fixes were successful and the Roomba side brush was still not spinning, there is possibly a software-related problem.
Not to fear, we offer the finest cure for software problems.
To use this fix, you must use a specific button combination to factory reset your Roomba.
Here’s how to quickly reset your Roomba:
- 1. Find your Roomba’s Home, Spot, and Clean buttons.
- 2. Press and hold each button for 20 seconds.
- 3. Release the buttons after your Roomba turns on its orange light.
- 4. Roomba will now reboot.
Roomba will alert you that the factory reset has been completed within a few minutes.
At this point, the side brush on your Roomba should be functioning as planned; otherwise, a hardware problem might be present.
You may still speak with the Roomba developers for a brief discussion, but if fixes don’t work, we’re very sure the side brush on your robot is damaged.
How to clean a Roomba side brush?
The Roomba should first be placed on a level surface like the floor or table. You can see its entire underside if you flip it over.
- Look at the cylinder-shaped brushes in the robot’s core. A brush guard would keep them in place.
- Take hold of the two yellow-painted levers at the brush guard’s corner and pull. By doing this, you may remove the brushes, and the guard will be released.
- Grab hold of each corner-positioned brush. The brush will have a yellow bearing on one side. The brush will easily exit the robot if raised by the bearing.
- Apply the second brush in the same manner. You may now start cleaning!
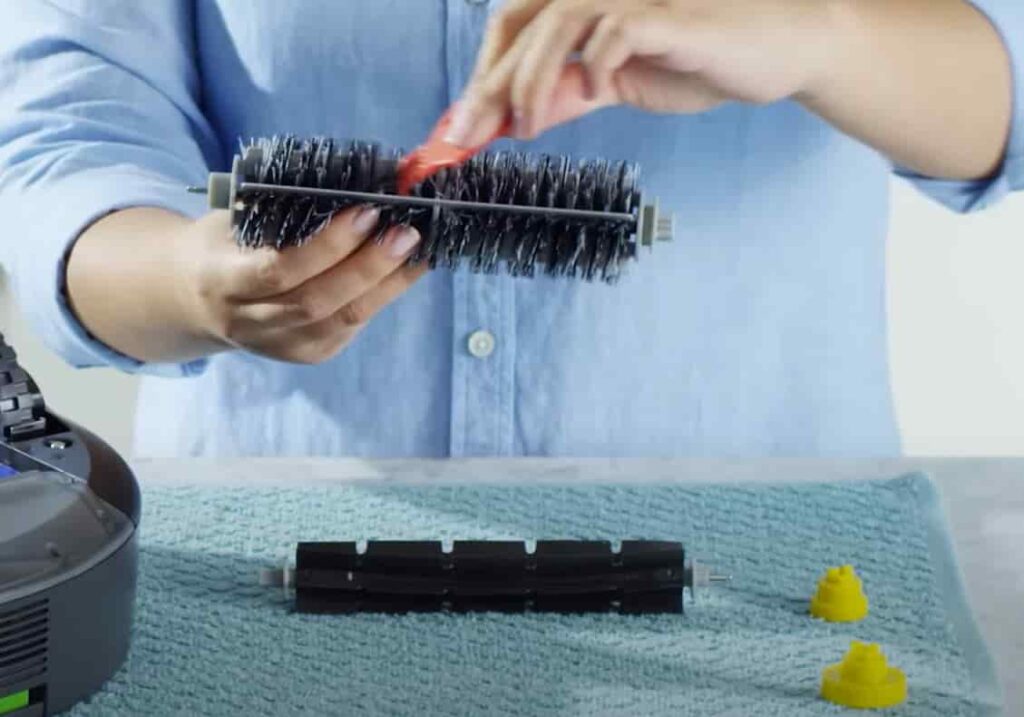
Start with the bearing first. Remove the yellow plastic cover and clear out any debris or hair that may have become lodged within. This should go quickly because there is nothing to cling to for the hair or dirt.
Then go to the brush itself. It will be harder to complete this part. You will need to pull on the hair firmly to remove it from the brush since it tends to wrap itself securely around the handle. Use a razor blade or scissors to cut the hair loose if it is wrapped too tightly.
Once the other brush is clean, repeat the process.
Reverse the procedure to return both brushes to their original positions inside the robot. Run a test cycle on the Roomba to see if the brushes are spinning once more.
If you try the solutions above and the brushes still won’t spin, you might need to take the Roomba in for service. The issues with the robot are considerably more pervasive, and most individuals lack the adequate equipment and expertise to solve them.
Why is Roomba’s side brush squeaking?
The conflict between the formative and metallic element portions is a common source of whining.
Friction between plastic and metal pieces is frequently the cause.
Apply some lubrication, such as silicone spray or something similar, but be cautious not to get any on the wheels or moving components.
A small amount of lubrication is usually sufficient.
The wheels and brushes of your Roomba are the two primary moving pieces.
One section of the home has a metallic axle and more significant gearing, while the other has a few gears and an electric motor.
A hexangular musical composition also protrudes from both sides of the home, where the side brush bases are.
Rotate the gear with your fingers to see if the axle revolves within the housing.
Use a pliers if it’s very starchy.
How can I clean the rotating brush on my Roomba?
Cleaning a Roomba side brush that is not spinning has been proven to be the most effective repairing the issue.
However, without the proper methods and step-by-step instruction, you may suffer.
It’s also worth noting that specific differences may exist based on the Roomba series.
However, there are a few methods you may follow to remove and clean your Roomba side brush quickly:
Step 1: Loosen the slope brush with a mint or modest screwdriver.
Step 2: To remove the brush guard, lift both yellow checks.
Step 3: Remove and clean any dirt and hairs within a hair’s breadth.
Step 4: Close the brush guard after reinstalling the brush worn and side brush.
Why isn’t Roomba’s side brush spinning after it’s been cleaned?
If the side brush motor or module is still not spinning after completing all the steps, check for an electrical connectivity problem.
To rule out the possibility of a problem, try re-inserting the battery into the cleaner.
Suppose your side brush module or motor is within warranty.
In that case, you may contact iRobot support to have it replaced or repaired, or you can purchase a new side brush from an online or offline retailer that is compatible with your Roomba model.
How to replace the roomba side brush module?
You’ll need to replace the side brush module if your side brush stops rotating.
Before you begin the repair, make sure the device is unplugged from the power source.
To change the module, loosen the first four screws and then remove the screw attached to the side brush; the base should now be lifted off.
You should now see the five modules after removing the base. The side brush, left wheel, right wheel, vacuum bin, and cleaning head module are the ones to look for.
If your side brush stops rotating, you’ll need to replace the side brush module, which is simple to perform by unscrewing the two retaining screws.
After that, you may replace it with a new module, and the side brush should usually work again.
Conclusion
Keep in mind that the most common cause of the Roomba brush not rotating is hair or dirt.
As a result, robot vacuum maintenance is necessary regularly.
Regularly, look for debris wrapped around the wheels and brushes.
You should clean the brushes and head module at least once a week if you have a cleaning tool.
If the Roomba brush becomes damaged, please replace it as soon as possible to ensure the device’s efficiency.
It is advised that you change the brushes after six months of use.
Leave a remark below if you have any queries concerning the iRobot Roomba.


